Tuesday, February 23, 2010

Almost Free Wall Art

While cruising the dollar bins at Michael's today (almost as good as cruising the dollar bins at Target) I ran across a cool chipboard phrase - imagine.  Kate is in a very imaginative phase right now. She spent all morning talking to her imaginary friend Jenny on my old cell phone.  Jenny couldn't come to Michael's with us because she had to go to "The Bunny Show", and then to her grandparents.  Except Jenny forgot that her grandpa died.  I kid you not, this all came out of Kate's mouth in the span of about 15 minutes.  So her other imaginary friend Jessica came to the store with us, and I had to buckle her in using the middle seat belt and had to offer her a snack, etc.

Anyway, back to the post at hand.  I knew I wanted to do something with the imagine word, so I snagged it - hey, it was only $1.  At home, I found the perfect scrapbook paper background that will match the new kitchen colors (we are doing a mini kitchen makeover, more to come on that) which are creamy yellow, red and black.  So I painted the word black and adhered it to the scrapbook paper (which I cut to fit a 8x10 frame I had on hand).


Total out of pocket cost now - $1.  Score.  You could create this yourself for approximately $7 if you didn't already have the scrapbook paper and frame on hand.

I think I'm going to link this up with Today's Creative Blog's "Get Your Craft On".  You can find lots more cool ideas through the link below...


A New Twist on the Laundry

You're two. You're bored.  What to do?  Why eat a milkshake while sitting in a laundry basket of course...


Wednesday, February 17, 2010

Best Kid's Birthday Card Ever

My mom's close friend made this card at a handmade card workshop she went to and didn't know who to use it for since her kids are older, so my mom gave it to Claire for her birthday. I LOVE this card. So much so that I am on a quest to find a punch like this.  I want to make 27 of these and give them for every birthday party my children attend.

I think it speaks for itself when you see it, and these pictures do not do it justice.


Monday, February 15, 2010

This is the snow that never ends....

it just goes on and on my friend....  Seriously.  Cincinnati has now broken a record for the most snowfall ever in the month of February (a record in place since 1914) and it is still coming down outside.  We are all getting cabin fever.  I have no memory of ever seeing this much snow on the ground at one time in Cincinnati, ever.  I haven't been out to measure today, but I'm guessing we're at about 14 inches on the ground currently.

Here is what it looks like out our front & back windows, as of this morning (another 3-4 inches have accumulated since then)


We have been trying to stay busy and have been doing crafts and playing baby dolls, but this afternoon we busted out a fort in the living room.  We re-arranged the furniture on Saturday and shifted our couch and loveseat over to one side of the living room (I was inspired by my friend Tiffany who has a very similar house layout to ours - thanks Tiffany!).  I'm not sure I love the section where the couch and loveseat are, but I love having the open space by the toys for things like this fort.  


I am hoping that tomorrow by lunchtime the roads clear up and maybe we can hit IKEA for lunch (it's just 2 miles down the road from us) or something to keep us from being cooped up all day.  The problem with this much snow outside is that it is too deep for Claire to get around in, so it's hard for us to go outside even!

I am really excited to get crafty tonight with a tool that has been sitting in my closet gathering dust for a while - I will post some photos tomorrow and maybe it will inspire you too....

Saturday, February 13, 2010

The Little Monkey Turns 2

My little monkey turned 2 today.  I can't believe it's been 2 years.  I think an old Baby Blues comment put it best - "The days are long and the years are short."  Amen to that!  In honor of her being our little monkey, and her Curious George obsession, I made Claire monkey cupcakes. I found the super easy instructions here.


Claire actually had a family party today, which I never had growing up since my family was all between 3-8 hours away.  This weekend my parents-in-law (is that a word?) and one of my brother-in-laws came down from NW Ohio, my parents came over and my sister and brother-in-law even happened to be up visiting from Atlanta.  It was really nice, and perfect for Claire.  We had presents, cake and ice cream before nap.

Claire was all about ripping open her presents.  She was not as much into actually opening the boxes to find out what was in them.  I think I could have wrapped up empty boxes and she would have been content.  However, she did make very cute "Wow!" sounds when she opened most presents.  Here are a few photos of the presents.  The first gift is a pack of toothbrushes (really - she is currently obsessed with brushing her teeth) and the last is her baby doll stroller.


She LOVED the stroller.  She pushed it around for over an hour after she opened it.  I am not exaggerating.  She put her baby doll in it and pushed it all over, as documented below.  However, she first buried her baby doll's face under her jiggly Koosh ball, and was very insistent about it. Very insistent.


She was a pro with her cupcakes - we put 2 candles in one and she blew them out with no assistance on about her 3rd try.  She was not so sure about everyone singing to her though - she kept trying to hide behind her hand. And Kate was really good about the fact that it was Claire's birthday, not hers.  There were only a few squabbles over the new toys.


We Love a Good Party...

Today was the day that Kate has been looking forward too for weeks.  She had DOUBLE Valentine Parties!  (For the correct effect, pretend you are 5 and say this while jumping up and down excitedly.)

First, we had her preschool Valentine party.  The wonderful mom that I am, I agreed to fill in for our room mom who couldn't make the party.  However, it means I was running around at the last minute and completely forgot my camera at home.  I hate with a passion when that happens.  The party involved things such as ice cream sundaes, Valentine Bingo and a Model Magic Craft.  Plus, I have to say kudos to my awesome friend Jen for corralling Claire during the party for me.  And for her awesome Valentine box craft.  I will post a photo Sunday of her awesome Valentine box craft, made from cereal boxes.  I made super-cute heart lollipops from leftover candy canes, which I found at Skip to My Lou, here.

Then, we quickly cleaned up and headed to her friend Avery's Valentine Party, which was already in progress.  Why is it that things always happen at the same time??  My super-amazing friend Tiffany over at Happy Day hosted.  I believe there were some games before we came (I saw some heart-shaped bean bags on the floor - heart shaped.  Really.) and we arrived just in time for a craft and lunch.  Sandwiches and cheese cut into heart shapes and strawberries.  Plus frost-your-own cupcakes for dessert.  With red frosting.  Tiffany is very brave!

Since I forgot my camera, some of my friends kindly sent their photos... here are some of the best.

Kate and Avery - how adorable is this.  Seriously. I love it.

Tyson and Claire - not a bad shot for trying to get 2 toddlers to cooperate for a photo.  These two are two peas in a pod, I swear.

Check out Tiffany's awesome handmade Love banner over her fireplace, which I think she explains how she made on her blog. And those cute preschoolers.

Kate frosting her own red cupcake.  Which she then refused to eat.  Go figure.  I am such a good mom that I forced myself to eat it for her.  :)

Wednesday, February 10, 2010

Free Pampers Sample

Do you have a kid in diapers?  If so, head here for a free sample of Pampers Cruisers with new DryMax. Sizes 3, 4, or 5 available.  I'm wondering if this is what I tested on one of diapers studies I did for P&G last fall?  :)  You have to register an account with P&G Brand Sampler to get the sample.

What's for Dinner Wednesday?

It's the return of What's for Dinner Wednesday.  Tonight at our house is "Darn Good Chili" (our favorite chili) and Beer Bread.  Beer Bread is so simple and so easy, you'll never pay $7 for a mix from a home party company again.  Don't get me wrong, I love all the tasty, simple (ahem) items that the company has, but I never, ever buy their Beer Bread after finding this recipe.  It's so simple it's almost unbelievable.

Your ingredients:

3 cups flour
1/4 cup sugar
1 Tbsp baking powder
1 tsp salt
12 oz beer, ideally at room temp
3 oz melted butter (or cooking spray)

Preheat oven to 375.  Grease a 9x5 bread pan well.

In a medium bowl, combine the first 4 ingredients.  Add beer, stir until combined, but don't overmix.

Spread batter in greased pan.  Pour the butter over the top (or to save calories, just spray the top with cooking spray, you really can't tell a difference).

Bake for 45 minutes, or until top is brown and crusty.

Turn loaf out of pan onto a cooling rack, and let cool 30 min before cutting.

Yum.  You can change it up by using soda instead of beer (lemon-lime soda is great, or you can use other fruity sodas like orange or Mt Dew, etc) or using a darker beer or a craft beer, etc.  If you want to make a whole wheat loaf, use a total of 3 cups of flour, subbing whole wheat for no more than 1 cup of regular flour.  Otherwise the loaf is extremely dense.

Tuesday, February 9, 2010

Updated Kitchen Work Station

We have a built-in desk/work station in our kitchen.  It's very handy and quite annoying at the same time.  Short of ripping out the entire desk and putting in a better cabinet, I organized and updated the desk this past weekend.  Here is the before image:


This really isn't that bad, either.  I'm kind of loathe to admit that, but this is definitely a "hotspot" and gets cluttered fast.  Lighting fast.

Well, in the hopes of cutting some of that clutter, and short of ripping out the cabinet and desktop and putting in a cabinet that is actually useful (ie - one that is all drawers instead of a super-annoying base cupboard with no dividers in it), I decided to make the back wall under the shelf a magnetic chalkboard, courtesy of some magnetic paint and chalkboard paint.

I took the bottom shelf down and taped across the line that was still on the wall from when we hung the shelf last year.  Then I opened the magnetic paint, which I bought about 2 years ago and hadn't gotten around to using.  The can actually recommends on the side of it having it mixed in the paint department machine - haven't mixed this can by hand, I heartily concur with the directions of having the paint dept do it.  It took a lot of stirring.  A LOT.  It also took a LOT of coats.  5 to be exact.  The can said 3.  I recommend 5, or even 6 if you'd like a magnet to actually hold up a piece of paper or two.  I did 5 coats and most magnets will hold up 2 sheets of paper on the wall.

I let the magnetic paint dry for a day, then topcoated with chalkboard paint (you could easily topcoat with a couple coats of paint to match your walls for a "hidden" magnet wall).

Here's the finished product, decluttered (mostly) and organized.  I'm pretty happy with it, and the girls are currently loving it - Kate plays tic-tac-toe on the wall almost daily.


Saturday, February 6, 2010

The Snowpocalypse that almost was...

I swear meteorologists are just guessing half the time. At least half the time. Over the past 72 hours, Northern Cincinnati went from getting 3-5 inches of snow to 8-12 inches of snow and back to 5-6 inches of snow.  I think we have about 4 inches on the ground.  The girls of course wanted to go out and play in it this morning - so Mark and I got all dressed and took the girls out.  Claire is still a challenge in the snow as it is hard for her to walk around and her hands don't stay in her mittens well, etc.  But she loves it and big sister was going out, so out she went too.

This evening Mark shoveled the drive and Kate went out to help.  I don't know what happened, but Mark came in and said "I need the camera" and when he handed it back there was this photo on it. Something about staring at the stars and being buried in snow.  Who knows.

Claire is turning two a week from today - which is unbelievable.  She seems like she has grown up so much in the past month.  I discovered last Sunday that her hair is long enough for one single ponytail in back.  It makes her look about 6 months older.

Off to build a fire and have some family time this evening (perhaps the Curious George movie - Claire adores Curious George right now), and finish my Valentine's Tote/Bag (using the Quilts Illustrated Charm Party Tote pattern - one of my favorites).  Pictures tomorrow.  Plus tomorrow is one more run to Kroger for the end of the Mega Sale event - gotta get my free goldfish if there are some left, and use my coupon for free Oreos that came in the mail today.  Yay!  So far I've done pretty well - saved about 60% on both trips during the sale.  This one might not be quite as high, as I'm going to buy a few things for the donations to Haiti that Kate's preschool is doing.  I got a letter Friday that they are parterning with the awesome organization that my sister Erin went on 3 mission trips with in high school Northwest Haiti Christian Mission.  So I'm going to be giving a bunch of stuff there - mostly medical related things like Tylenol, Advil, vitamins, first aid items, etc.  If you haven't given anything yet to Haiti relief, please consider NWHCM.  Their need is increasing as people leave Port-Au-Prince and head to NW Haiti which has much less earthquake damage.

Friday, February 5, 2010

Giveaway on an awesome blog

One of my favorite blogs, Today's Creative Blog, is featuring a giveaway from a fellow Etsy artist - a $50 gift certificate for some beautiful stamped jewelry.  Be sure to check it out!


Thursday, February 4, 2010

Applique T-shirt tutorial

This is a documented first attempt at applique.  It's not perfect, but overall I'm very happy with it and learned a few things that I need to try a bit different for next time.  Thankfully Kate isn't picky, and declared that she "LOVED IT!!!" and the matching skirt I whipped up when she saw them this morning and hasn't taken them off since except for ballet class.

Here is what you need for this project...


  • 1 pre-washed T-shirt (I used one of Kate's she already had which had a stain on it - I love getting new life out of old things)
  • Fabric of your choice in a piece large enough to cut the image of your choice out of - pre-wash the fabric
  • Cardstock or cardboard (like old cereal boxes or the like) to make your template from
  • "Wonder Under" or "Heat N Bond" - this needs to be in a big sheet and not the skinny "no-sew" hem tape.  I bought mine at Joann's (with a coupon, of course) and it was in the notions section near the interfacing.  I think it may also come on a bolt (Pellon is the manufacturer), but I'm not sure.  If you buy a package, keep the package, as it has has the directions for use on it.
  • Iron
  • Coordinating thread
  • Sewing machine (you could do it by hand if you are more patient than I am)
Step 1
Trace or Draw the image that you want onto your cardstock, then cut it out.  If you are drawing, you could draw directly onto the papery side of the Wonder-Under.  It's your choice.  I made a simple flower design.

Step 2
Trace your cardstock/cardboard image onto the papery-side of a piece of Wonder-Under. This is hard to see in the photo below - sorry!

Step 3
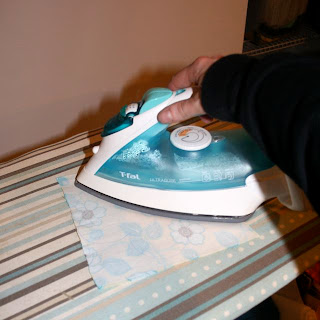
Iron your piece of Wonder Under to the wrong side of the fabric of your choice, following the directions on the package.

Step 4
Cut out the fabric image around the lines you traced on the Wonder Under.

Step 5
Carefully remove the paper backing from the fabric image.

Step 6
Position the applique on the T-shirt and iron on following the directions on the Wonder Under.

Step 7
Set your sewing machine to it's zigzag stitch.  Shorten the stitch length down a bunch.  On my machine, I chose a stitch width (how big your zigzag is, basically)  of 6.0 (on a 7.0 scale) and a stitch length (how far apart the zigzags are) of 0.3 when standard length was 1.4.  Zigzag back and forth over the edge of the entire applique.  This ensures the edges won't fray, and gives it a bit of an "outline" effect.  This was the most challenging part, as the knit of the T-shirt wants to stretch some as you're maneuvering it through your machine.  I think this is one of those "practice makes perfect" steps.  Alternately, you could skip zig-zagging and just straight stitch around the edge of the applique, but the edges of the applique may fray a bit over washings.  It's your choice.  Unless you are hand-sewing, in which case for the sake of your own sanity you just want to straight-stitch as close to the edge as you can.

Step 8
TA DA!  You are finished!

Overall, I am pretty happy with the finished result.  The T-shirt puckered up in a few places around the edges of the applique where it stretched as I was sewing.  However, for the cost of the material (both were in the clearance bin at Joann's last month for $2 a yard) and giving new life to a T-shirt that had a stain, I give this project 2 thumbs up.

My suggestion is to try something similar for your first time - see if you can find an old T-shirt of your child's that has a stain or a tear or something and see if you can breathe new life into it with an applique.  Chances are it will look better when you're done than it did before!

The coordinating skirt is simply a basic gathered skirt that I sewed a contrasting strip on the bottom of.  Sew the strip on, sew the side seams together, hem the bottom, put a casing for elastic on the top.  If you want step by step directions for this I can give them, but there are a bunch of free tutorials on a basic gathered skirt already out there.  I will post a picture as soon as I can get Kate to stop twirling around in it!!!

**Update** - since posting this, I've discovered that it greatly helps to use a mid-weight stabilizer on the underside of the T-shirt below the applique.  I use the "sew-on" kind and then tear away the excess.  It definitely helps stop the puckering/stretching of the T-shirt.

Another attempt...

Okay - so I completely abandoned the entire blogging thing for, oh, the past six months or more.  I am aware of that.  I did have intentions from time to time to come back and get back into the swing of things and update but obviously it never happened.  But a new year, new things (yes, I know it's already February)... so here I am. Again.  A bit sheepish, but I'm back.  I'm not quite sure what this blog may morph into this year - I'm leaning towards a bit more crafty things and of course some bargain shopping, etc.  But we shall see.  I am also hoping that I stick with things a bit more this time.  Life is rather crazy right now - trying to step up my Etsy business and contemplating officially filing it as a business, plus putting in quite a bit of time with our awesome church overseeing the early childhood area, plus tackling some home improvement projects (a new kitchen floor and dishwasher) as soon as our tax refund arrives, and then there's simply being a mom & wife.  Wow.  I'm tired just typing it.  Thank you Lord for caffeine.
So tomorrow I really want to post the photos/tutorial for an applique shirt and matching skirt that I made for Kate tonight.  I'd post it now but it is WAY to late, so it will have to wait until tomorrow at nap time most likely.

LinkWithin

Blog Widget by LinkWithin